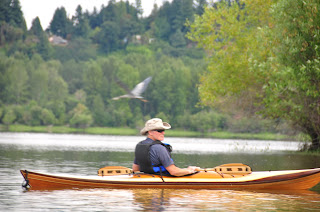
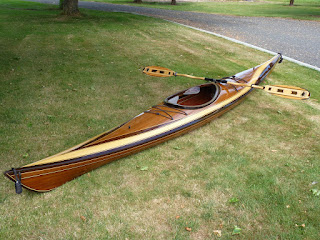
Launched the boat in Vancouver lake on Sun. the 14th for its maiden voyage with my son Jim along in his kayak.
The kayak performed beautifully (according to Jim, for I am certainly no expert). We were out for about an hour and a half and throughly enjoyed it. Vancouver Lake is an ideal lake for kayaking, very quite and peaceful with a lot of wildlife too see.
This has been a very satisfying experience that I throughly enjoyed, thanks in part to the outstanding help, understanding (for all the time and money invested), and support from my lovely wife, but am glad that it's done and I can move on to other things. So it's time to mount it on the wall for a while.
Jim Jr. taking a turn.
THE END! At least for now.
Jim's Kayak Project
I am building a cedar strip wood kayak. I purchased a kit for the "Spring Run S" from Redfish Kayak & Canoe in Port Townsend, Wa. The kit consists of an 18' long shipping crate which contains all of the 5/8" wide western red cedar strips as well as some Alaskan yellow cedar and Peruvian black walnut for accent colors. There is also another crate which contains 16 forms that mount on the strong back as well as fiberglass cloth and epoxy resin and miscellaneous other items. The shipping crate becomes the strong back after unpacking. The 16 forms are mounted and aligned on the strong back and the boat is built around these forms.
The Spring Run S is 16' 9" long with a beam of 23 7/8". I am still deciding on the design I will choose for the layout of the deck. There are endless possibilities for the design, whatever your imagination can envision.
Blog Archive
-
▼
2011
(12)
- April 24 - May 1 (1)
- July 3 - July 10 (1)
Monday, August 15, 2011
Monday, August 8, 2011
FINALLY FINISHED!!
Well, it is finally finished and ready to launch.
I spent a lot of time and learned a lot in the finishing process, but it finally looks like I want it to. Lots of varnishing, sanding. and buffing.
Finished today with the rigging, seat, thigh braces, and rope handles.
I spent a lot of time and learned a lot in the finishing process, but it finally looks like I want it to. Lots of varnishing, sanding. and buffing.
Finished today with the rigging, seat, thigh braces, and rope handles.
Friday, July 8, 2011
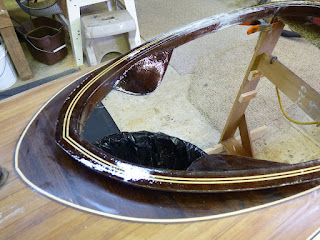
Pictures of Varnished Kayak.
Here are some Pics of the boat with the (hopefully}final coat of varnish. I plan to let it cure for 2 to 3 weeks, and then sand with 1500/2000 grit wet sandpaper and then buff. Then it will be ready for the final touches. Seat, Deck rigging, etc
.
.
Wednesday, April 27, 2011
MATING HULL TO DECK
A few pictures showing the glassing of the hull to the deck.
2" fiberglass strips hot glued to the inside edge of the hull.
Hull and deck taped together and ready for applying epoxy to the inside fiberglass strips. It was quite the process aligning the edges properly and taping. Worked out well however. It's a rather nasty job applying the epoxy. Involves inserting your head in small hatch openings along with arm and a long stick with resin soaked foam on the end, reaching into the ends of the boat to soak up the glass strips.
Hull and deck glassed together, inside only. Next step is sanding and fairing outside seam, the repeating the 2" glass and epoxy on the outside of the seam, then sanding the entire boat. At this point the only thing left other than finish work is fitting and installing the two bulkheads.
Friday, April 8, 2011
A few pictures of not much visible progress.
Magnetic Hatch installation complete.
Cockpit Coaming glassed.
Slots cut for deck rigging Soft Padeyes. These slots to be filled with black thickened epoxy, then a 3/32 slot will be cut in the center of the filled slot for installation of the webbing for rigging.
A few more small items to address, then will be ready to mate the deck with the hull, then lots of sanding and finish work.
Friday, March 18, 2011
Coaming Lip, Paddle Park, & Magnetic Hatch cover install.
Coaming Lip epoxied in place.
Hole cut for Paddle Park and epoxied in place. Fiberglass reinforcement underneath.
Pictures depicting installation of magnets in hatch covers. Holes are spot-faced, magnets placed in holes and sealed in place with a layer of glass & epoxy resin.
Hatch covers held in place on deck and installation of magnets and sacrificial seal on underside of deck. There is a barrier placed between hatch cover and the buildup on the deck so cover can be removed after the epoxy buildup and 5 layers of glass have cured.
Next I will cut out the excess in the center to about 1/8" from the magnets. First I have to make an adapter for my palm router to make the cut.
Next steps will be installation of thigh braces on coaming wall, then buildup of a panel of strips that the fore and aft bulkheads will be made from.
Subscribe to:
Comments (Atom)


